Steps Wiring Atmos & 2.4 A. Wire Harness.
Thank you for choosing
Atmos! Please refer to the following installation instructions to ensure appropriate power is provided to the
Atmos unit.
ATMOS CONTROLLER
UNIT INSTALLATION
ATMOS CONTROLLER
UNIT INSTALLATION
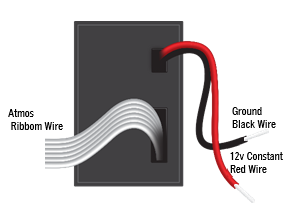
- Connect the black (ground) wire to the metal body of the vehicle with a self-tapping screw. Alternatively, you may use an existing, grounded screw or bolt, if available.
- Connect the red wire to a constant, hot, 12-volt power source. The fuse tap (optional) allows easy wiring to the fuse box.
- Tuck and hide wires securely away from daily activity to avoid stressing the wire connection points.
2.4 A POWER UNIT INSTALLATION
If your power unit does not have a white wire…
Complete the following instructions, skipping step 3.
- Connect the black (ground) wire to the metal body of the vehicle with a self-tapping screw. Alternatively, you may use an existing, grounded screw or bolt (if available).
- Connect the red wire to a constant, hot, 12-volt power source. A fuse tap (optional) allows easy wiring to the fuse box.
- Connect the white wire to a 12-volt power source that is tied to ignition. A fuse tap (optional) allows easy wiring to the fuse box.
- Tuck and hide wires securely away from daily activity to avoid stressing the wire connection points.
If you want to bypass IgnitionSense…
By default, your GPSLockbox Flex unit powers your tablet only while the vehicle is running. If you wish it to provide constant power, connect the white wire to a constant 12-volt power source instead of a power source that is tied to ignition.
.
- Connect the black (ground) wire to the metal body of the vehicle with a self-tapping screw. Alternatively, you may use an existing, grounded screw or bolt (if available).
More Information please call or email us!
866-824-4023